For equips, character customization and mix and match, the ideal solution is to use dynamic skins composed at runtime.
mix-and-match-spine-unity.zip
Attached is a .spine project you can open in Spine 3.1 or higher along with its images.
And a .unitypackage you can import into your project.
The .unitypackage includes sample scene, code and two separate jsons for compatibility with Spine 3.3/3.4 or Spine 3.0-3.2.
The Spine runtime is not included.
SPINE EDITOR SIDE
The Spine project shows how the different parts/equips are split into their own Skins.
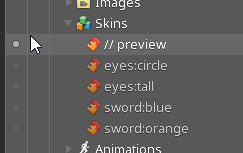
See the Skin named "//preview" to preview the animations. Having a "// preview" skin will allow you to see a complete skeleton while you are animating in Animate Mode. The Spine editor currently has no other way of previewing a combination of multiple skins.
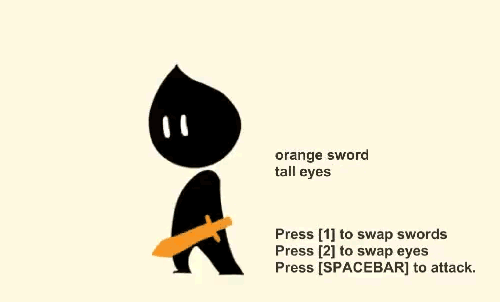
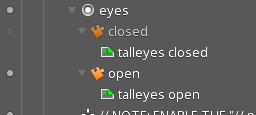
The skeleton has two equippable swords and two eye variants.
Each sword has 3 images drawn at different angles, to showcase that an equip can be animated, and can have more than one attachment. Each eye type also has open and closed images.

UNITY SIDE
The .unitypackage contains sample scene, exports and code on how multiple skins are combined into a custom skin at runtime.
Open the Unity scene and play it.
Press SPACEBAR to play the animation.
The character will swing the sword (swap between 3 images).
The character will also blink (swap between 2 images)
You can "customize" the sword and the eyes on the fly by pressing the 1 and 2 keys.
See "MixAndMatchSampleController.cs" to learn about the code.
Essentially, it shows you how to get references to skins defined in Spine Editor, and combine them into a new runtime-generated skin which you can then modify freely.
void GenerateSkin () {
// Make a new Skin, and add the entries from existing skins defined in Spine Editor.
Skin mySkin = new Skin("My Generated Skin");
SkeletonData skeletonData = skeletonAnimation.skeletonDataAsset.GetSkeletonData(false);
AddSkinEntries(skeletonData.FindSkin("sword:orange"), mySkin);
AddSkinEntries(skeletonData.FindSkin("eyes:tall"), mySkin);
// You can also set individual attachments by using Skin.AddAttachment
// This way, you can populate your custom skin with Spine.Attachments from another source. It doesn't need to be from Skins you made in Spine editor.
//mySkin.AddAttachment(noseSlotIndex, "nose", someNoseAttachment);
// Removing is a bit tricky (for now)
//mySkin.Attachments.Remove(new Skin.AttachmentKeyTuple(mustacheSlotIndex, "mustache"));
// Now that your custom generated skin is complete, assign it to the skeleton...
var skeleton = skeletonAnimation.skeleton;
skeleton.SetSkin(mySkin);
// ...and make sure the changed attachments are visually applied.
skeleton.SetSlotsToSetupPose();
skeletonAnimation.state.Apply(skeleton);
}
static void AddSkinEntries (Skin source, Skin destination) {
var sourceAttachments = source.Attachments;
var destinationAttachments = destination.Attachments;
foreach (var m in sourceAttachments)
destinationAttachments[m.Key] = m.Value;
}
The sample code prioritizes readability over architecture/optimization. So you should structure actual production code according to your needs.
22 Sep 2016 12:42 pm
Here is a separate set of sample experimental methods that can help integrate UnityEngine.Sprites or loose Texture assets into your Spine Skeleton. Similar basic functionality is also provided by the Spine.Unity.Modules.SpriteAttacher module.
AttachmentUtility.cs on Gist
Resulting attachments can be added to your dynamic skins.