Path constraints
Path constraints are not available in Spine Essential.
A path constraint adjusts bone transforms using a path. Bones can be translated along the path and have their rotation adjusted to point along the path.
Path constraints can replace translation keys, allowing movement to be defined more easily by using a path. Many other uses involve constraining multiple bones to a path, then controlling the bones by manipulating the path rather than adjusting each bone individually. For example, bones can be spaced evenly along a path or can be scaled up, causing them to appear to grow along the path.
See the path constraint demo, example projects, and tips for usage examples.
Setup
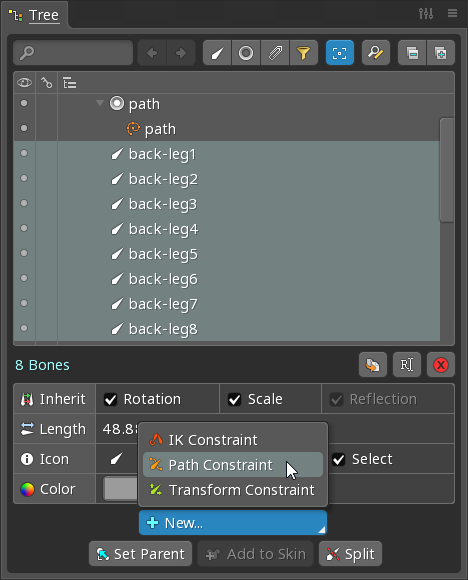
To create a path constraint, select the bones to be constrained, then click New... Path Constraint in the tree properties. Next, choose a slot in the tree or an existing path in the tree or viewport.
The path constraint does not actually target a path, instead it targets a slot. The path constraint will use the path visible for that slot, if any. This provides extra flexibility because a single path constraint can work with multiple paths.
Properties

Bones
This shows the constrained bones. When one bone is constrained, clicking the bones selects it.
When multiple bones are constrained, they are shown in a select box. The order the bones appear along the path can be modified by opening the select box and dragging the bones up or down.
Opening the select box and clicking a bone will select that bone. Right clicking a bone name without opening the select box will select that bone.
Different bones can be chosen by clicking the pencil icon. This clears all the constrained bones and allows new bones to be chosen. The order the bones are chosen determines the order they will appear along the path.
Target
This property shows the target slot. If the slot has a path visible, it is also shown. Clicking either selects the slot or path.
A different slot can be chosen by clicking the pencil icon, then choosing a slot or path.
Spacing
Length or Proportional are useful when different spacing is needed between each bone.
Spacing controls how the bones after the first bone are positioned along the path.
Lengthplaces each bone using the length of the previous bone. The spacing value is added to the length of each bone.Fixedplaces the bones spaced equally using a fixed distance.Percentplaces the bones spaced equally using a percentage of the total path length.Proportionalplaces the bones spaced to take up the entire path when the spacing value is 100. Each bone's length determines the proportion of the total path length used for spacing.
The spacing slider adjusts the spacing value. The spacing value can be keyed.
Position
Position controls where along the path the bones are positioned.
Fixedplaces the bones at a fixed distance along the path.Percentplaces the bones at a distance along the path equal to a percentage of the total path length.
The position slider adjusts the position value. The position value can be keyed.
If the path is not closed, when the position is before the start (negative) or past the end of the path, the position is determined using a straight line in the direction the start or end of the path is pointing. This is shown as dashed lines when the path is selected.
Position handle
The position handle won't be selected if ctrl (cmd on Mac) is held. This can help to select a knot or handle under the position handle.
The position handle appears on the path in the viewport when the path is selected.

Dragging the position handle changes the position value and can be more convenient than using the position slider.
Rotate Offset
The rotate offset is added to the rotation computed by the rotate mix. This is provided for convenience, so bones can point in a different direction without needing to use an extra bone to do so.
Rotate Mix
The rotate mix controls how the bones are rotated, translated, and scaled to match the path.
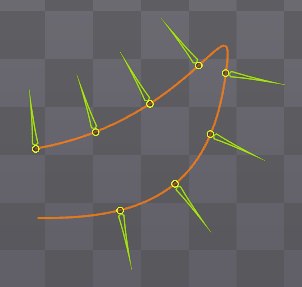
Tangentrotates the bone to point in the direction of the path at the bone's position. This means when the path bends, the tip of the bone likely won't be on the path and the bone won't point at the next bone.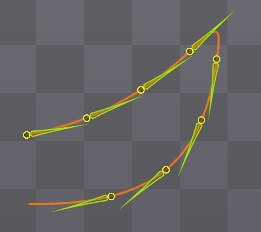
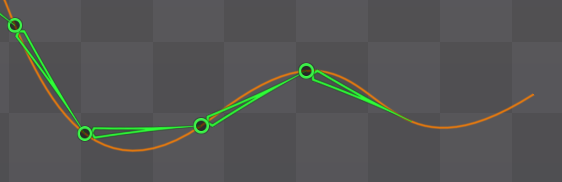
Chainfirst translates the bone to be at the tip of the previous bone, then rotates the bone so it points at the next position along the path, determined by spacing. When the rotation offset is not zero, the translation is not applied. When the path bends sharply, the previous bone tip may not be on the path (see image below).Chainis useful when the bones represent something rigid, such as tank treads.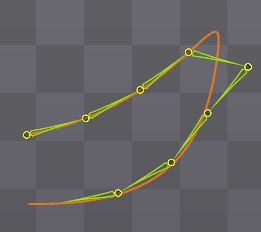
Chain Scalefirst rotates the bone so it points at the next position along the path, determined by spacing, then it scales the bone so the tip is at that position. This ensures all bone positions and tips are on the path.Chain Scaleis useful when the bones represent something flexible, such as a rope. When using
 Chain Scale, all of the constrained bones should have the same parent or the first bone should be the parent of the rest of the bones. If they don't, a warning icon is shown and the scale applied by the path constraint may be incorrect.
The rotate mix slider adjusts the rotate mix, see constraint mix. The rotate mix can be keyed.
When the rotate mix is greater than 0 and less than 100, moving the target bone may cause the rotation to suddenly use the other direction. This occurs because interpolation between the bone's rotation and the constraint's rotation uses the shortest rotation direction.
Often the rotate mix is used only briefly to transition to or from 0 and 100.
Translate Mix
The translate mix controls how much the contraint affects the bones' translation, see constraint mix. The translate mix can be keyed.
When Link sliders is checked, the rotate and translate mix sliders will move together.
Color
The color of the position handle and the path constraint's tree icon uses the color of the first constrained bone.