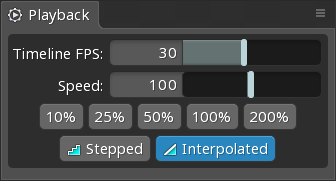
Playback view
The playback view provides access to various animation playback settings.

Timeline FPS
The default timeline FPS for new projects can be set on the settings dialog.
The timeline FPS (frames per second) slider sets the frames per second used by the timeline. All the skeletons and animations in a project use the same timeline FPS.
While 30 FPS is a good default for most users, some animators have an intuitive sense of how many frames a certain movement will take when animating at 12 or 24 frames per second.
Changing the FPS can also be useful when animating fast movement. Holding shift allows setting keys between whole number frames, but if that is needed often it may be more comfortable to increase the FPS to retain the benefit of snapping to whole number frames.
Changing the timeline FPS
When the timeline FPS is changed, the keys in your animations remain on the same frame numbers, but the time between frames is faster or slower. That means the speed of your animations in the Spine editor and at runtime will be faster or slower.
Since changing the timeline FPS changes the speed of animations, it should usually be set before creating any animations. To change the timeline FPS without changing the speed of animations (meaning the keys will be on different frames) perform these steps:
- Export the project to JSON (
ctrl+E). - Create a new project (
ctrl+shift+N). - Set the new timline FPS in the playback view (
alt+Pin animate mode). - Import the JSON data (
alt+F,D). On the import data dialog, be sure to uncheckNew projectso the data is imported into the current project, where you have set the desired timeline FPS. - You may want to set the default timeline FPS to avoid the wrong timeline FPS on new projects (
F12).
Speed
The speed slider controls the playback speed. This can be useful to play an animation slower than normal to ensure that there are no errors that would be hard to see at a faster speed. The percentage buttons provide shortcuts for setting the slider to the corresponding value.
The playback speed affects playback of all skeletons and animations equally. It is not stored between Spine editor runs, exported, or available at runtime. Code that applies an animation at runtime is free to use its own speed multiplier.
Stepped
When enabled, a stepped transition is used between all keys. This means no interpolation will occur between keys. This can be useful to see the keyed poses of an animation without being distracted by interpolation between keys, such as when animating using pose to pose.
Interpolated
When Interpolated is not enabled, playback is rounded to the nearest frame. This means no interpolation will occur between frames. This is a stylistic choice which makes playback less smooth, resulting in a look similar to frame-by-frame animation.
